
The A Finale Emberforged world quest is a thrilling addition to Genshin Impact 5.5, set against the backdrop of the Heart of the Sacred Mountain. This quest becomes accessible once players have successfully completed the Chronicler of the Crumbling City quest series. Upon finishing the tasks associated with this series, players will unlock the subsequent quests, An Omen of Annihilation and The Final Entreaty.
Unlocking A Finale Emberforged in Genshin Impact
To begin the quests An Omen of Annihilation and The Final Entreaty, players must first complete all quests in the Chronicler of the Crumbling City series. The quests required are outlined in the table below:
| Chronicler of the Crumbling City Quest Series | ||
| Genshin Impact: The Frozen, Rekindling Land | Genshin Impact: The Forsaken Sea of Wisdom | Genshin Impact: Sealed Site of Sacrifice |
| Genshin Impact: In Search of a Hidden Heart | Genshin Impact: Once, the Sacred Seat of Judgement | Genshin Impact: Where Once There Was a Calculation Array |
| Genshin Impact: Where Once Force Was Reversed | Genshin Impact: Where Once There Were Arms Aplenty | Genshin Impact: The End of the Road |
| Genshin Impact: As the Burning Sun Sears Shadows | ||
Walkthrough for An Omen of Annihilation and The Final Entreaty

Following the completion of the Chronicler of the Crumbling City, the new quests begin. You will restore the Heart of the Sacred Mountain by eliminating all Abyssal contamination.
To proceed, approach the altar positioned at the center of the Heart of the Sacred Mountain and present two Golden Entreaties, which can be obtained through the Between Pledge and Forgettance and Lost Traveler in the Ashen Realm quest series. Additionally, you will encounter two Precious Chests during your journey.

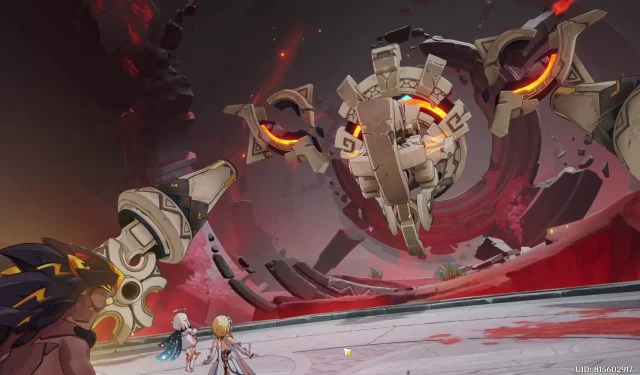
Upon submission, a cutscene will unfold, revealing a pathway to a radiant light that teleports you to a new area. Explore this location to find a vast platform where you’ll encounter the Source Dragon Mech, an imposing mechanical dragon characterized by its floating head and two hands. Prepare for a challenging battle using the Traveler.

This initial confrontation against the Source Dragon Mech is unwinnable, as the creature will trap your character. Subsequently, the scene shifts to Little One, who attempts to rescue you but lacks the necessary power.
At this juncture, Kukulkan makes his entrance and engages in an extensive dialogue, which is packed with significant lore content. Players invested in the rich storyline of Genshin Impact should pay close attention to these discussions.

Kukulkan unveils his objective of causing the ultimate end of Teyvat, transforming it into Phlogiston, referred to as Huitzilopochtli. Players face a crucial choice:
- **Confirm Activation** – This leads to a timeline where the world faces destruction.
- **Cancel Activation** – The only means to avoid the catastrophic loop.
Choosing to cancel Huitzilopochtli will provoke Kukulkan, who will attempt to persuade you otherwise. Disregard his words and ascend the glowing stairway ahead to reunite with Paimon and the Traveler.

As you make your way to help your friends, Kukulkan’s voice may try to sway you from your path, but remain steadfast and locate your allies. Engage in a renewed confrontation against the Source Dragon Mech.

This time, you will collaborate with Little One, who temporarily shifts into a more mature form. During combat, when the dragon prepares to attack, press **T** to allow Little One to absorb the blow, thereby creating a shield that stuns the dragon and renders it susceptible to damage. Repeat this strategy until the Source Dragon Mech is defeated.

Upon securing victory, Little One casts away Flamelord’s Blessing, evolving into a fully revitalized Tepetlisaur. The quest culminates as you converse with Paimon and Little One, effectively concluding A Finale Emberforged.
Rewards for Completing A Finale Emberforged
As a reward for completing the A Finale Emberforged quest, players will receive:
- 50 x Primogems
- 5 x Hero’s Wit
- 34,000 x Mora
- 4 x Mystic Enhancement Ore
- 1 x The Cornerstone of Stars and Flames
- Achievement: Flowers for Someone