
Genshin Impact has introduced exciting new exploration mechanics in its Natlan region, particularly highlighting the Monetoos. These are smaller and more elusive compared to Seelies, making them a unique challenge for players. With each new map expansion in the game, new variations of these creatures emerge, with the latest being the Matador Monetoos introduced in version 5.5.
This comprehensive guide will cover the locations and strategies for solving all Matador Monetoo puzzles across Genshin Impact.
Discovering Monetoos in Atocpan and Ancient Sacred Mountain: Genshin Impact 5.5
Strategies for Solving Matador Monetoo Puzzles
To successfully tackle the Matador Monetoo puzzles, players should utilize characters like Varesa, Iansan, or the newly introduced Saurian Tatankasaur. The key to solving these puzzles involves persistently hitting the Monetoos with these characters until they pause in a specific spot. Upon stopping, players must hit them twice more to unlock chests containing rewards.
Location Guide for Matador Monetoos
1. First Location
")
To find the first Matador Monetoo, teleport to the waypoint indicated in the image. Move straight ahead, and you will encounter a Tatankasaur nearby.
2. Second Location
")
For the second Matador Monetoo, teleport to the initial waypoint in the newly introduced Atocpan map. Upon arrival, turn right and head towards the small pool; you will discover two Tatankasaurs interacting with the Monetoo.
3. Third Location
")
This Matador Monetoo is essential for unlocking one of the Warrior’s Challenges on the 5.5 map. Teleport to the waypoint located south of the Lava Dragon Statue Boss, and proceed straight to find a baby Tatankasaur accompanying the Monetoo.
4. Fourth Location
")
At this fourth location, teleport to the waypoint shown above. You will see a Matador Monetoo situated on a cliff ahead, with nearby transformations of the Tatankasaur available to aid in solving the puzzle.
5. Fifth Location
")
Head to the same waypoint as Location 4. Continue straight and traverse the mountains until reaching the edge of the Atocpan map, where you will find an Ancient Glazeback Turtle along with the Matador Monetoo.
6. Sixth Location
")
This Matador Monetoo is easily accessible. Teleport to the Statue of Seven in Atocpan, then turn around to spot multiple Tatankasaurs near this Monetoo.
7. Seventh Location
")
To locate the seventh Monetoo, teleport to the waypoint close to a small island as shown in the image. After arriving, turn around to find the Monetoo, guarded by Sauroform Tribal Warriors with a chest nearby.
8. Eighth Location
")
This Monetoo is also prominently visible. Teleport to the waypoint near the new Artifact domain, descend to the beach, and observe as a Tatankasaurus chases after this Monetoo.
9. Ninth Location
")
The final Matador Monetoo in the Atocpan region can be found by teleporting to the waypoint shown above and continuing straight ahead, where you will encounter a Tatankasaurus transformation and a Monetoo being pursued by Hilichurls.
10. Tenth Location
")
The first Matador Monetoo in the Ancient Sacred Mountain region is found by teleporting to the vicinity of the Infinitesimal Local Legend. Turn left upon arrival, and you will see a Tatankasaur near this Monetoo.
11. Eleventh Location
")
Again, teleport to the waypoint near the Infinitesimal Local Legend but this time, turn to the right. You should see another Tatankasaur chasing a Matador Monetoo in the distance.
12. Twelfth Location
")
The twelfth Monetoo is situated near the Ruined Armament Workshop. Teleport to the indicated waypoint, look back, and proceed directly towards the Workshop area. You will discover a Monetoo on the first segment of a broken bridge nearby.
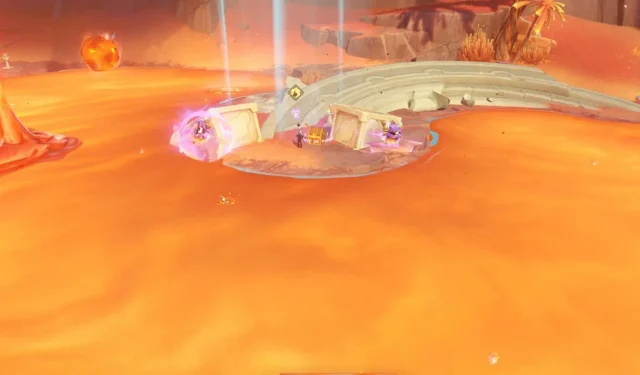
13 and 14. Final Locations
")
To unlock the last two Monetoos, teleport to the waypoint at the Heart of Force Inversion. Descend from this spot to discover a locked Precious chest nearby. Dig at the marked location, and this will release both Monetoos. One will head right while the other veers left.
These strategic locations and tips will enhance your exploration and puzzle-solving experience in Genshin Impact’s latest update.