

Mastering the Megalithic Vault in Assassin’s Creed Shadows
Navigating the Megalithic Vault in Assassin’s Creed Shadows can be a challenging task, particularly due to the limited visibility that accompanies the dark environment. As you explore the various rooms and corridors, understanding the mechanics of navigation is essential for progressing through your quest. With a bit of illumination, players can find their way around this mysterious structure more easily.
A critical component of gameplay involves collecting Knowledge Points, which can be obtained through the Kofun missions within the game. Not only is it vital to complete these missions for leveling up your Knowledge, but they also dictate the skills you can unlock for characters such as Yasuke and Naoe. Failure to prioritize these Knowledge Point missions will ultimately hinder their capabilities in completing fundamental tasks. The Megalithic Vault offers one Knowledge Point upon completion, along with additional loot rewards.
Quick Navigation Links
- Entry to the Megalithic Vault
- First Area of the Vault
- Subsequent Area of the Vault
- Initial Movement Puzzle
- Second Movement Puzzle
- Acquiring the Chest & Final Rewards
Entry to the Megalithic Vault
Location and Preparation


To find your way into the Megalithic Vault, look for a designated marker in the northwest region of Yamato. The nearest viewpoint is Koriyama Forest; from there, proceed slightly north and northeast. Pay attention to the unique keyhole-shaped landform, which is primarily surrounded by water. Your goal is to reach the apex of this formation to access the entrance.
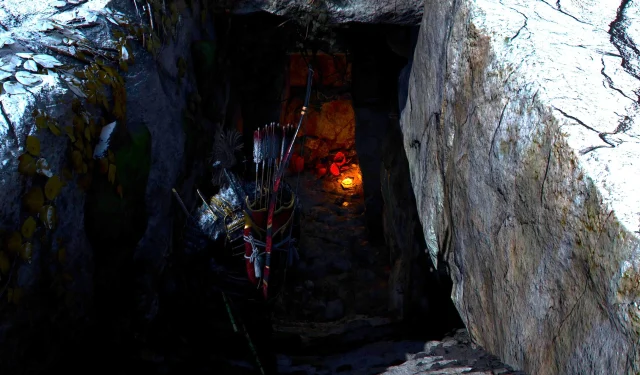
Inside, you’ll encounter stairs leading downwards. Use the character Yasuke for this mission to effectively manipulate the shelves that you will encounter. Ensure you have a bow or a teppo on hand to solve some of the challenges within the Vault—these items can be acquired from any gear vendor if you’re lacking.
Once at the bottom, move the box obstructing your path to officially enter the Kofun area. Lighting candles as you explore will aid visibility, as the environment can be disorientingly dark.
First Area of the Vault
Exploring Deeper

After illuminating the area, locate the explosive and position it beside the unstable rocks blocking your way. Maintain a safe distance and use your teppo or bow to detonate it. While the Vault contains a few spots to replenish your arrows, there is only a singular location for replenishing teppo ammo.
Proceed to the next room, which features a breach in the floor. Take a moment to survey the surroundings; you will spot a chest behind a barricaded door. To advance, you will need to jump down—do so confidently, as there’s water waiting to break your fall.
Subsequent Area of the Vault
Successfully Navigating the Path

Upon diving into the water, you’ll find a chest at the bottom. Collect your treasure; for me, it was the Agile Samurai Outfit (Uncommon Armor). Keep in mind that the rewards can vary with each playthrough, though they typically yield uncommon items.
Ascend from the water and continue through the passage, navigating a staircase. On your left, you’ll encounter a dead end—take the right path instead while utilizing the new stealth mechanic allowing you to go prone. After emerging, you’ll need to vault over an obstacle, which should happen automatically if approached with sufficient speed. Once again, switch to prone to enter the following room.
Initial Movement Puzzle
Solving the Box Movement Challenge

In this section, you’ll encounter a movement puzzle that requires you to deftly rearrange boxes to clear the pathway. By shifting one box to the right, you can reveal another loot box; I found the Bamboo Fence (Cosmetic). Continue by pulling back the larger box on the right to access the next passage.
Illuminate some lights within the room for clarity, then pull the smaller box through the newly revealed opening and position it against the wall. Scale it to access the upper part of the room. Move to the right, where you will find a bridge that you must leap across to progress further.
As you continue, heading right will lead you to a dead end capped by a barred door. Instead, choose the left route and proceed straight to enter the following section.
Second Movement Puzzle
Continued Box Manipulation

You’ll arrive at a ledge where you’ll need to jump down. Although I lit a candle in this area to orient myself, it isn’t strictly necessary. After descending, take note of various pathways—while they may seem daunting at first glance, navigating them is simpler than anticipated. Remember to light candles as you proceed since visibility will become crucial.
One of the boxes can be pulled towards you; do so to clear the passage indicated by the blue arrow in the visual guide. As you reach the end of this path, grab the box and pull it back, unlocking the area marked by the yellow arrow. Return to your previous room and you can now access the box situated past the coffin and against the opposite wall. Switch to pushing this box to improve visibility, and scale the pillar to navigate around the room. Though Yasuke’s platforming skills might be unsteady, you should reach the next opening without significant issues.
The following room is relatively straightforward. Follow the wooden ledge around and jump across gaps to approach the final area of the Vault.
Acquiring the Chest & Final Rewards
Exploring the Statues Room

In this unusual room, you’ll encounter six small statues surrounding a central pile. Take the opportunity to refill your arrows here and then crawl directly behind the statues. Other apparent exits will be inaccessible at this point. Move through and leap across the gaps until you reach the end of the passageway, where you’ll find a small chest containing a piece of common headgear.
From here, peer through a hole in the wall to spot a pile of coins or Mon below the window. Use your projectile to blow up the blocking structure and return through your previous path into the statue room. You can now push the box forward through the newly opened doorway. Upon entering, turn right to reach the treasure room, where you’ll discover:
- Elegant Samurai Outfit (Legendary Armor)
- Posture Damage per Adrenaline Chunk (Legendary Engraving)
In addition to these coveted items, you will also earn a Knowledge Point and experience points. Lastly, move the box adjacent to the treasure chest to crawl through the opening, successfully completing the Megalithic Vault challenge in Assassin’s Creed Shadows.