
Quick Navigation
The Blue Prince universe is home to a variety of engaging puzzle boxes, with the Trading Post puzzle being one of the first players encounter. Accessing this distinctive Outer Room may require some effort, but successfully completing the Trading Post puzzle earns players a valuable, permanent reward.
To unravel the Trading Post puzzle, it is essential for players to grasp the mechanics of a 3×3 grid, aligning the right colors with the designated corners. This guide provides step-by-step instructions on how to tackle and open this intriguing puzzle box.
Locating the Trading Post Puzzle Box

The Trading Post puzzle can be discovered within the Trading Post, a specialized Outer Room accessible only after unlocking the West Gate. To achieve this, players must learn how to operate the Garage Door that leads to the area beyond the gate, enabling entry into the Outer Room.
Inside the Trading Post, players can trade items with others, but a notable addition is a mysterious puzzle box located on a bench in the back left corner.
Solving the Trading Post Puzzle
Unlocking the Secret of the Trading Post Puzzle Box

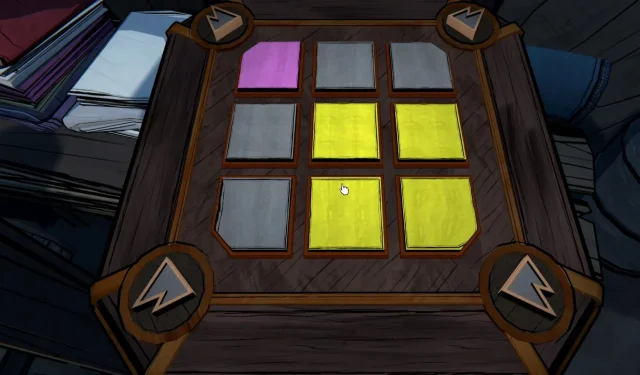
The Trading Post puzzle is represented by a compact puzzle box situated in the room’s back corner. This 3×3 grid resembles other box puzzles found throughout the game, yet each puzzle possesses its unique characteristics and demands a tailored approach.
A common element across all Blue Prince puzzles is the requirement to position specific colors into each corner of the grid. To complete the puzzle, players must securely lock in correct colors by clicking the mountain symbol located on each corner.
For this particular challenge, it’s crucial to maneuver the yellow tiles to occupy each corner of the grid.
- Clicking the purple tile rotates the surrounding tiles.
- Clicking the tile above or below the purple one will shift the purple tile into that position.
- The purple tile can only move vertically, not horizontally.
- Clicking a yellow tile raises it one space.
- Note: Yellow tiles cannot be moved downward.
The main objective is to get a yellow tile into each corner while positioning the purple tile in an outer row middle slot to avoid hindrance. Here is a strategic sequence to solve the Trading Post puzzle:
| Column 1 | Column 2 | Column 3 | |
|---|---|---|---|
| Row 3 | 1-3 | 2-3 | 3-3 |
| Row 2 | 1-2 | 2-2 | 3-2 |
| Row 1 | 1-1 | 2-1 | 3-1 |
- Initiate by clicking the purple tile (1-3) to rotate the middle yellow tile to the left.
- Next, click the middle left yellow tile (1-2) to interchange its position with the purple tile.
- Click the bottom middle yellow tile (2-1) to shift it into the center.
- Click the purple tile twice to rotate the two adjacent yellow tiles.
- Click the middle yellow tile (2-2) to elevate it by one space.
- Click the purple tile once to rotate the surrounding yellow tiles.
- Click the middle yellow tile (2-2) to move it up again.
- Click the purple tile four times to rotate the surrounding yellow tiles.
- Click the yellow tile on the middle right (3-2) to move it up.
- Once all corner tiles are yellow, click each mountain symbol to finalize the Trading Post puzzle.
If you find yourself stuck, you can reset the Trading Post puzzle by selecting one of the corner symbols without a yellow tile. This action will revert the board to its original state.
Rewards for Completing the Trading Post Puzzle


Upon solving the Trading Post puzzle, players receive an Allowance token, a permanent enhancement that allows Simon to begin each attempt with a small amount of Gold in the Entrance Hall. This upgrade ensures enhanced resources and greater exploration opportunities.
This exclusive reward grants an additional 2 Gold daily, which can be collected on the next run. However, players cannot return to the Entrance Hall to retrieve the earned Gold during the same run in which the puzzle was completed.