
The Witch’s Gambit mission is one of the intriguing Vengeance quests found within the Act III of Destiny 2’s Heresy storyline. As a key component of the seasonal narrative, players must navigate through these quests to advance. The Witch’s Gambit, in particular, poses a unique set of challenges that can be somewhat perplexing for Guardians navigating its tasks.
This guide aims to provide a comprehensive walkthrough for the Witch’s Gambit mission, ensuring you tackle the objectives with clarity and purpose.
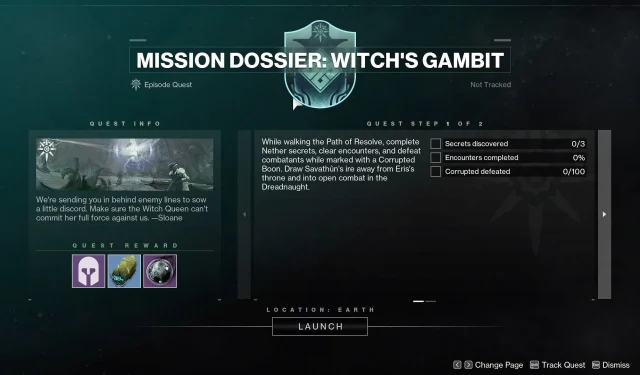
Mission Overview: Witch’s Gambit in Destiny 2
Before diving into the mission itself, it is essential to set your Slab to the Resolve path/Dark mode. This adjustment will enhance your gameplay experience in the Nether.
1. Discovering Secrets
The Witch’s Gambit mission consists of three primary objectives that can be achieved either in a single run through the Nether or through a series of steps. For the purpose of this guide, we will focus on the latter approach. You can initiate your quest from any of the five starting spawns available in the Nether.
It is recommended to enable “Exploration Private”mode when launching the Nether activity. This mode allows you to complete tasks at your own pace, making it ideal for solo players.
")
Upon spawning, seek out the Toland Orb, also referred to as the white Taken Orb. Approach it, and it will guide you through various pathways. After engaging with the orb multiple times, a chest will eventually spawn—interact with it to complete this phase of your task. For instance, the Mausoleum area is home to one such Toland Orb.
")
After obtaining the first chest, you can reset the activity and search for another Toland Orb in a different location. For example, the Trenchway also features a Toland Orb that can be utilized for this mission.
")
Repeat this process three times to successfully uncover all the required secrets. Keep in mind that each area within the Nether houses a Toland Orb, contributing to your overall mission completion.
2. Completing Encounters
Your next objective involves defeating any enemies and completing an encounter. Use your Ghost to identify encounters in the Nether, indicated by a grey ‘Star’ marker on your map.
")
Remember, the final boss within the area also qualifies as an encounter, allowing you to check off this task as you progress.
3. Defeating Corrupted Enemies
This step can yield confusion among players, especially if they are unclear about what qualifies as a ‘Corrupted’ kill. If you find yourself unable to progress after defeating several enemies, it may be due to the absence of a Corrupted Boon during your run. To acquire this boon, complete an encounter and keep an eye out for the Corrupted Boon.
")
Corrupted Boons function as dual buffs and debuffs at the same time. For instance, the “Overcharged Abilities”boon provides a standard buff, but is coupled with a corrupted debuff. Collect these boons and then engage enemies to achieve the required ‘Corrupted’ kills.
By following these steps methodically, you should be well-equipped to complete the Witch’s Gambit mission successfully.