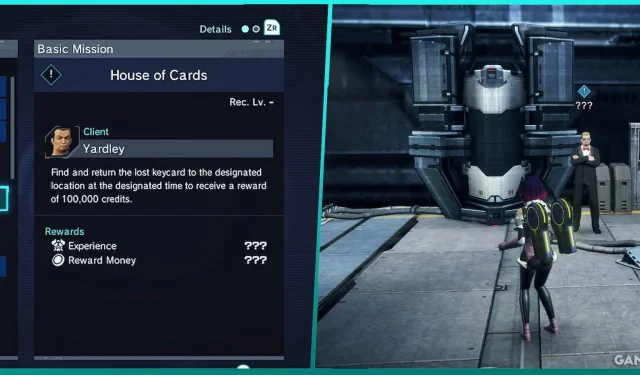

The **”House of Cards”** quest is a foundational mission in Xenoblade Chronicles X: Definitive Edition, where players embark on a hunt for Yardley’s elusive keycard. While this may appear to be a straightforward side mission, progressing through “House of Cards”is essential for unlocking character customization options. On your initial arrival at New Los Angeles, you won’t have access to this feature until specific preconditions are met. Below, you will find detailed steps to successfully complete the “House of Cards”mission.
Guide to the House of Cards Mission
Locating Yardley’s Keycard


To start the “House of Cards”mission, you must first collect it from the task board located in NLA. Before the mission activates, ensure that you have completed the following requirements:
- “Yardley’s Scheme” (accessible post Chapter 3)
- Progression through Chapter 5
Once these conditions are met, the mission begins with the search for **Yardley’s keycard**, situated in the Administrative District. Utilizing the Follow Ball feature, which you obtain from Tatsu, will guide you directly to the Restricted Hangar. Within this hangar, the keycard is concealed behind two stacked red cargo containers, positioned in the upper western section.
For precise navigation, refer to the map images above—specifically looking for landmarks between Armor Alley and Regina’s store, which is where the “Booming Business”mission begins. Pay attention, as the map primarily displays the top floor of NLA and may lead you astray if you search in areas outside the suggested locations.
Accessing the Restricted Hangar

You may have already unlocked the fast-travel point leading to the entrance of the **Restricted Hangar**. If you haven’t, locate the elevator situated south of Division Drive’s landmark. Use the blue diamond and red arrows on the reference image for assistance.
Returning Yardley’s Keycard

After successfully retrieving the keycard, head over to the **Barista Court** within the Commercial District. The location of Yardley can be identified by an exclamation point on your map. Remember to visit him during the afternoon to return the keycard.
Although the quest suggests a reward of **100,000 credits**, this amount will not be delivered upon completion. Instead, Yardley will request a follow-up meeting later at night, introducing a new objective marker within the Administrative District, specifically directed to a zone beneath it.
Finding Yardley’s Hideaway


To reach **Yardley’s Hideaway**, activate the elevator in the **Restricted Hangar**, then jump beneath it once it has risen. You’ll find yourself in the area below NLA. If using the Follow Ball feature, navigate toward the blue objective marker. Be aware that your path to Yardley’s Hideaway may be obstructed by storage containers that require you to jump over.
Modifying Your Character’s Appearance
Is Name Change Possible?
After returning the keycard, although you won’t receive the anticipated 100,000 credits, Yardley provides access to a customization machine for your character’s Mimeosome. To utilize this machine, approach the capsule and press the A-button.
Keep in mind that the machine is operational only during the Late Night window, specifically from 12:00 AM to 5:00 AM. You can alter the game time by pausing and navigating to System, then selecting Change Time. Please note, equipping certain gender-specific clothing, such as **Grenada Swimwear** (Female), will restrict available options.
While altering your character’s name is not an option, you are free to change various aspects, including their **voice**. If you’re considering gender alterations, simply select the first option during the customization prompts.