
In the realm of life simulation games, InZOI stands out not only for its stunning graphics but also for its innovative features that empower players to unleash their creativity through extensive customization options. A particularly exciting aspect is the ability to upload personal textures or utilize the game’s integrated AI to automatically generate textures tailored to individual preferences.
The hallmark of InZOI is its capability to create custom 3D objects. Players can upload images to the game, which the AI processes through what is branded as InZOI’s “3D printer.”These unique creations can serve as distinctive furniture in the game’s elaborate building mode or be fashioned as wearable accessories. An exciting feature allows players to upload and download 3D-printed objects via Canvas, fostering a collaborative environment where users can share and enjoy each other’s designs.
Utilizing the 3D Printer in InZOI


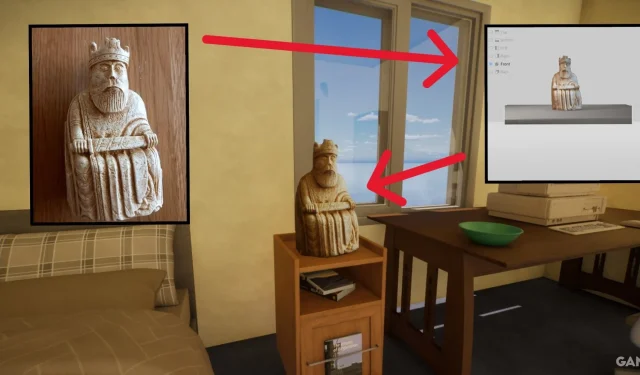
To begin creating with the 3D printer, navigate to the fourth tab on the left side when in build mode. Players can then upload an image from their device. The game’s AI will process this for about 20 seconds, with options available to regenerate the object for varying results.
Once the object has been generated, careful adjustment is crucial. For instance, if imagining the grey surface as a shelf, rotating the object appropriately will determine whether it lies flat or stands upright, similar to a chess piece.
Optimal Image Selection for 3D Printing
The effectiveness of creating 3D objects in InZOI highly depends on the quality of the uploaded image, with the feature expected to advance as the game progresses through Early Access.
Flat objects, like a shield, can be represented effectively using a PNG image with a transparent background, though a blank backdrop suffices. It’s important to note, as seen with the chess piece, that avoiding images with holes is crucial, as the AI tends to fill these in improperly.
If the aim is to create fully 3D assets that appear appealing from various angles, utilizing JPEGs is advisable. Pictures should incorporate depth; side views are preferable to achieve a three-dimensional appearance. Moreover, minimizing glare and avoiding direct sunlight will significantly improve results.
Leveraging Symmetry Mode for 3D Creations


Upon generating an object, users have the option to create symmetry. While not always necessary, players can mirror their creations either vertically or horizontally, selecting which axis to make symmetrical in the blue zone.
Symmetry proves particularly useful for creating flat designs. When making such objects, simply select a small portion to mirror, thus producing a slender final product. Ensure the symmetry function is activated, adjust the object as needed, and then press Create Again when satisfied.
Placing 3D-Printed Objects in InZOI

Once custom models are crafted, wondering how to implement them in your space is natural. There are multiple methods available.
Incorporating 3D Objects into Homes

To integrate these custom creations as furniture, go to the Craft tab within build mode, where the printer is also located. Players will see their unique designs and simply need to drag and drop them into their house. Much like traditional furniture, these 3D objects can be resized and rotated as desired.
Additionally, players can download custom 3D printed assets from others via Canvas, easily accessible in the upper right corner of the screen.
Be mindful when attempting to place 3D objects on elevated surfaces or other pieces of furniture, like shelves. A practical approach involves starting with smaller items, such as plates or stacks of books, on a flat surface, then editing these to resemble any desired 3D printed creation.
Utilizing 3D Decorations as Fashion Accessories

A fascinating feature of InZOI is the ability to incorporate these models into character outfits. In the Character Studio, head to the last Craft tab. The first option displayed will be for 3D Printer Decorations.
Select this option and designate a part of the body to which the decoration will be applied along with the chosen 3D printed item. The customization allows for considerable scaling and rotation versatility, enabling players to add whimsically unique elements like horns, amusing watches, or even a shield from Kingdom Come: Deliverance 2 as a crest, as illustrated above.
To access these once saved, simply navigate to the Accessories tab where a Custom option will be available. These designs can seamlessly integrate with any outfit, enhancing personalization and creativity within the game.