
In the survival game 7 Days To Die, players are presented with a variety of mission types, ranging from straightforward tasks such as buried treasure hunts to complex challenges that demand skill and strategy. As you advance through different trader tiers, you unlock progressively difficult missions, including the notorious infested missions. These tasks entail venturing into areas teeming with various forms of undead, offering the chance for players to engage in thrilling combat.
Although tackling an infested mission can be daunting, the rewards in terms of experience points (XP), valuable loot, and sometimes rare items make them worthwhile endeavors. This guide will provide insights on how to excel in infested missions in 7 Days To Die.
Initiating an Infested Clear Mission

To embark on an infested clear mission, your first step is to visit one of the game’s traders. In a typical map, you will find five traders: Rekt, Jen, Bob, Hugh, and Joe. While it doesn’t matter which trader you choose, the specifics of the mission location and tier you select are crucial. The higher the tier, the more formidable the enemies you’ll encounter. Furthermore, the biome influences the difficulty level, with places like the Wasteland housing more aggressive foes compared to the forest.
Infested missions become available after completing 10 tier 1 missions, thus unlocking tier 2 missions. These missions are significantly more challenging than standard clear missions, with tougher zombie types including radiated zombies, cops, and ferals. By reaching tier 6, players are faced with the most intense challenges in the game. However, with the right gear and preparation, these missions can be tackled successfully. Regardless of the tier, the primary objective remains: eliminate all hostile entities within the designated area.
Successfully Completing an Infested Clear Mission

Upon arriving at the mission’s Point of Interest (POI), activate the mission by interacting with the marker positioned at the entrance. It’s important to note that once activated, you must remain within the area; straying too far will lead to mission failure. Dying during the mission will cause you to respawn outside the designated area, automatically resulting in a failed mission.
Each POI is designed to guide players along a specific path, indicated by various lighting sources such as torches and lanterns. Inside these structures, you’ll find several trigger points that activate events—like floor collapses or unexpected zombie hordes—upon crossing a threshold. Therefore, exploring alternative routes can help circumvent these surprises and keep the mission manageable.
It’s advisable to carry a few building blocks during your mission. Should you fall into a trap, having these on hand allows you to construct a quick escape. Additionally, they can provide vantage points to catch zombies off-guard, especially if you avoid the main paths.
Once activated, zombies will appear as red dots on your minimap, indicating their proximity to your position. By monitoring these markers, you can maintain awareness of threats and plan your moves accordingly.
As with any zombie-themed game, aiming for the head is crucial as it represents the weak point for most zombies. However, some enemies exhibit distinctive abilities that warrant special attention:
| Zombie Type | Abilities | Strategy |
|---|---|---|
| Cops | Exude toxic vomit and explode when damaged | Stay at a distance and seek cover when they prepare to attack. |
| Spiders | Possess incredible jumping ability | Listen for their screech; this indicates an impending jump, allowing you to ready yourself for combat. |
| Screamers | Can call additional zombies | Prioritize eliminating these to prevent overwhelming numbers. |
| Demolition Zombies | Carry explosives | Avoid hitting their chest; if they begin to beep after a hit, quickly retreat. |
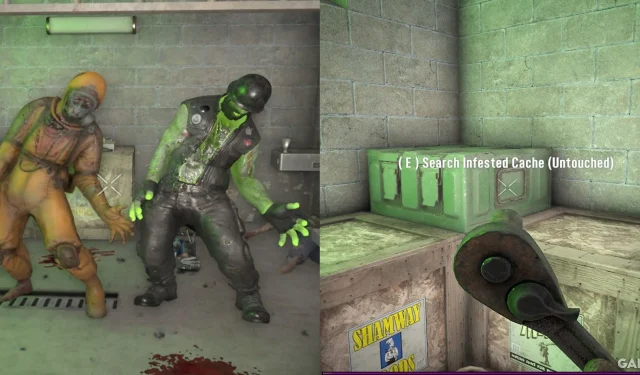
As you approach the final area of the mission, be prepared to encounter a wealth of loot containers. However, exercise caution, as this is often where the majority of zombies spawn. Before entering, ensure you are fully healed, equipped with reliable and reloaded weapons, and familiar with your exit strategy. A crucial survival tip is to always be aware of your escape routes; in dire situations, it’s vital to exit swiftly.
Upon clearing out all threats, your mission objective will update, prompting you to return to the trader for your rewards. Ensure you collect all available loot from the final room, as infested clear missions typically offer not only standard loot but also a special infested cache containing valuable resources, including ammunition and items that enrich your inventory.
Rewards for Infested Clear Missions

Once you’ve returned to the trader, you will be prompted to select a reward; however, the outcome is random. The quality of rewards received is influenced by multiple factors, including:
- Game Stage
- Loot Stage
- Mission Tier
- Skill Point Investments
Your game stage increases naturally through gameplay progression, and while loot stage also improves over time, it can be further enhanced by skills like Lucky Looter or mods such as the Treasure Hunter’s mod. Additionally, selecting higher-tier missions will yield superior rewards.
Investing skill points into the A Daring Adventurer perk is another strategic move; this will amplify the Dukes (the in-game currency) you earn from mission completions. At rank 4, it even allows you to opt for two rewards instead of just one, a significant advantage when aiming for rare items like solar cells or legendary components.
After claiming your rewards, consider selling any surplus items obtained during your mission back to the trader. Each sale earns you 1 XP, which may seem minimal, but bulk selling can swiftly accumulate thousands of experience points with minimal effort.